Motivation
Recently I was faced with an annoying problem related to programming the RP2xxx controllers on any Raspberry Pi using the Arduino IDE.
Only the version1.x is available and not version 2.x which has a couple of quite useful features.
Yes, VsCode or Eclipse may be used, but for my use cases they provide a plethora of functions from which I am only using a tiny fraction.
And following an attempt of using the most simple tools I wanted to use only an editor (worst case “vi” 😇) and the command line.
In the Windows world Notepad++ would be a good choice, but I am in the ***IX world.
A first decision:
Use Geany like an IDE
Making this choice was quite simple.
Geany provides syntax highlighting for many languages and I was using it for SQL and executing scripts from within Geany.
Geany also provides a „Terminal“ which avoids to open a separate „xterm“.
Re-arranging the „Terminal“ makes Geany almost looking like an IDE.
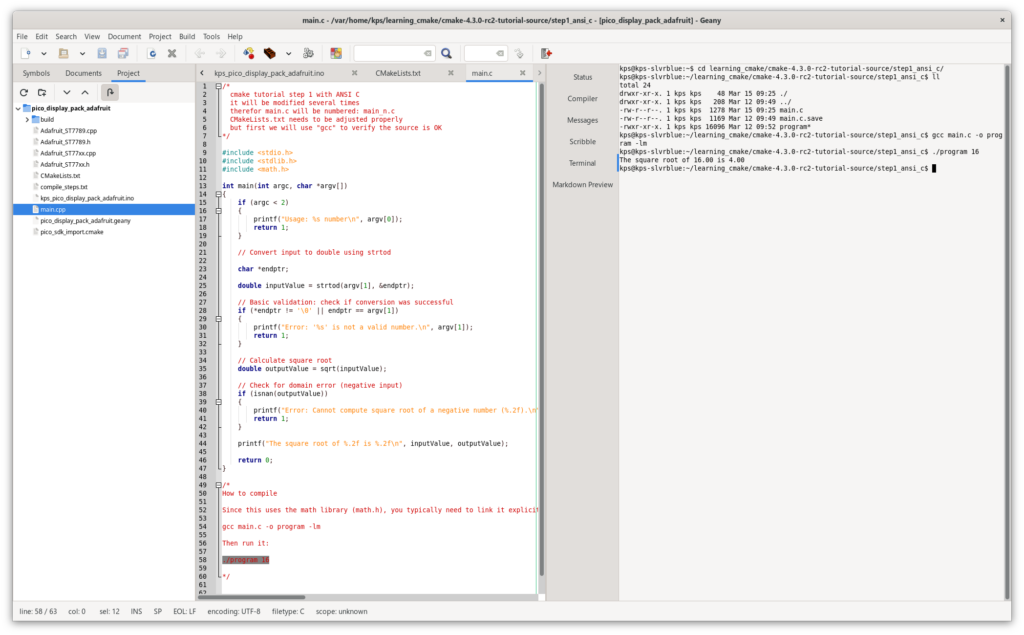
Sometimes I want to access this Geany from a different PC.
Because the Raspberry Pi is „headless“ there are two possibilities to do that:
Enable remote access on the Raspberry Pi and use the TigerVNC viewer
or
connect to the Raspberry Pi via „ssh -X“ and start Geany.
You will be confronted with the situation Geany doesn’t show up.
The Internet provides the answer: Geany requires special treatment.
You have to start Geany with ‘GDK_BACKEND=x11 geany &’.
By adding an alias in „.bashrc“ this can be made pratical.
alias rmt_geany='GDK_BACKEND=x11 geany &'Now, you can „ssh -X“ to the raspberry Pi and start Geany with „rmt_geany“.
But what to do in Geany on the command line?
Reading the Raspberry Pi PICO SDK manuals and observing the examples and libraries leads to „cmake“.
VsCode is using „cmake“, too, but I want to use the command line and want to understand how „cmake“ works.
This leads to Learn „cmake“!
„cmake“ is not a programming language.
„cmake“ helps to build an executable from many different sources.
In my case the executable will be loaded onto an RP2xxx processor doing something useful.
Learning „cmake“ basics can be done with native „C/C++“ code on Linux.
Later the knowledge may be adapted to cross compiling code for the RP2xxx.
Even developing on a Raspberry Pi is „cross compiling“. because they have a different architecture,
There are many so called “tutorials” available out there in the wild that choosing one should lead you towards the one offered by the original people from cmake:
Getting started with „cmake“ at cmake.org
Working through these tutorials is helping to understand „cmake“, but is diving quite quick into the depth of available possibilities causing frustration.
There is no debugger available!
After the first chapters I found what I needed to start with:
the function „message()“!
You will find out quite quick „cmake“ is using many „CMakeLists.txt“ files constructing a configuration.
And there are really many of them!
Remember The Program:
|
1 2 3 4 5 |
#include <stdio.h> main() { printf(“hello world\n); } |
It should show what the computer has been commanded to do:
„Print the words: hello world“.
With „cmake“ we may want to see which parameter value is used by a certain command?
Or which directory is used to find a library?
With these simple ingredients I will start to learn „cmake“ on the job.
My programs usually are based on
- a main project file
- many additional sources, sometimes as function collections or sub-functions.
- existing libraries to be re-used
- my own libraries to be re-used
This leads to a structure like:
|
1 2 3 4 5 6 7 8 9 10 11 12 13 14 15 16 17 |
$ tree my_pico_projects/ my_pico_projects/ ├── libraries │ ├── library_1 │ └── library_2 ├── my_libraries │ ├── my_library_1 │ └── my_library_2 └── my_pico_project_1 ├── pico_project_1.c ├── pico_project_1_defines.h ├── sub_function_1 │ ├── sub_function_1.c │ └── sub_function_1.h └── sub_function_2 ├── sub_function_2.c └── sub_function_2.h |
The challenge is to compile everything from within „my_pico_project_1“ with the simple „cmake“ command line calls.
As usual it is wise to start very simple.
A „C“ program can be compiled without any involvement of „make“.
|
1 |
$ gcc main.c –o program –lm |
This creates an executable „program“ which can be executed with:
|
1 |
$ ./program |
A typical „C“ program in the embedded world looks like this:
|
1 2 3 4 5 6 7 8 9 10 11 12 13 14 15 16 17 18 19 |
#include <std_library.h> #include “my_library.h” int main(void) { /* initialise variables and peripherals */ initialise(); /* the endless loop */ while(1) { read_sensors(); calculate values(); post_messages(); } /* this will never be reached, but required by the compiler return 0; } /* end main */* |
Which questions from the compiler should be answered?
- where do I find my source files?
- which function arguments are required?
- what to do with the values?
- etc.
The answers should be given through a whole bunch of „CMakeLists.txt“ files used in a hierarchical manner.
Continue reading with:
„A first very simple example“