After the motivation is given to learn „cmake“ and working through the first modules of the official cmake tutorial, the first conclusion is: there is no debugger!
Back to the roots and use a print command to show what is going on.
„cmake“ knows a command „message()“.
This command together with some variables can be used to make the configuration step more verbose.
For example:
|
1 2 3 4 5 6 7 8 9 10 11 12 13 14 15 16 17 |
project( hello LANGUAGES C CXX ASM DESCRIPTION “This is a simple, but quite verbose cmakelists file” ) # we keep CXX so the SDK can use C++ # forward the project name to the outside message( “The project is named: ${CMAKE_PROJECT_NAME}” ) # forward the description to the outside message( “The project is used for: ${CMAKE_PROJECT_DESCRIPTION}” ) |
„cmake“ variables start with „CMAKE_“ and there are many of them.
(https://cmake.org/cmake/help/latest/manual/cmake-variables.7.html)
„${CMAKE_PROJECT_NAME}“ points to „hello“, the name used in the „project()“ command.
„${CMAKE_PROJECT_DESCRIPTION}“ returns the string after „DESCRIPTION“ and should be used to describe what this project will be used for.
The project structure looks like:
|
1 2 3 4 5 6 7 8 9 10 |
step0_ansi_c/ ├── build │ ├── CMakeCache.txt │ ├── CMakeFiles │ ├── cmake_install.cmake │ ├── hello │ └── Makefile ├── CMakeLists.txt ├── compile_steps.txt └── hello_world.c |
Within Geany I am using the „Project Manager“ plugin and created a project from a directory.
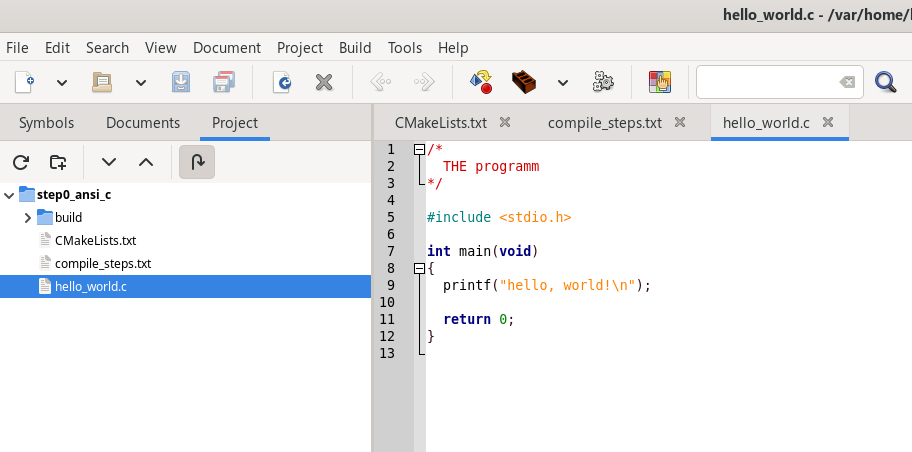
I can modify all necessary files now.
The file „compile_steps.txt“ is just supporting my laziness and I can use to „cut and paste“ the different commands in the Geany terminal.
„hello_world.c“ is the classic program from Kernighan and Ritchie.
I think this is the most often used program since the 70s in the last century.
The „CMakeLists.txt“:
|
1 2 3 4 5 6 7 8 9 10 11 12 13 14 15 16 17 18 19 20 21 22 23 24 25 26 27 28 29 30 31 32 33 34 35 36 37 38 39 40 41 42 43 44 45 46 47 48 49 50 51 52 53 54 55 56 57 58 59 60 61 62 63 64 65 66 |
cmake_minimum_required( VERSION 3.23 ) # forward the version to the outside message( “The minimum cmake version required is: ${CMAKE_VERSION}” ) project( hello LANGUAGES C CXX ASM DESCRIPTION “This is a simple, but quite verbose cmakelists file” ) # we keep CXX so the SDK can use C++ # forward the project name to the outside message( “The project is named: ${CMAKE_PROJECT_NAME}” ) # forward the description to the outside message( “The project is used for: ${CMAKE_PROJECT_DESCRIPTION}” ) set( CMAKE_C_STANDARD 11 ) # forward the c standard to the outside message( “The c standard is: ${CMAKE_C_STANDARD}” ) set( CMAKE_CXX_STANDARD 17 ) # forward the cpp standard to the outside message( “The cpp standard is: ${CMAKE_CXX_STANDARD}” ) # create executable with the ${CMAKE_PROJECT_NAME} add_executable( ${CMAKE_PROJECT_NAME} ) target_sources( ${CMAKE_PROJECT_NAME} PRIVATE hello_world.c ) # forward where to find the source message( “The current source dir is: ${CMAKE_CURRENT_SOURCE_DIR}” ) # forward where to find the binaries message( “The current binary dir is: ${CMAKE_CURRENT_BINARY_DIR}” ) |
Configuring „cmake“ with these instructions returns:
|
1 2 3 4 5 6 7 8 9 10 11 12 13 14 15 16 17 18 19 20 21 22 23 24 25 |
$ cmake –B build | tee cmake_conf.txt The minimum cmake version required is: 3.28.3 — The C compiler identification is GNU 13.3.0 — The CXX compiler identification is GNU 13.3.0 — The ASM compiler identification is GNU — Found assembler: /usr/bin/cc — Detecting C compiler ABI info — Detecting C compiler ABI info – done — Check for working C compiler: /usr/bin/cc – skipped — Detecting C compile features — Detecting C compile features – done — Detecting CXX compiler ABI info — Detecting CXX compiler ABI info – done — Check for working CXX compiler: /usr/bin/c++ – skipped — Detecting CXX compile features — Detecting CXX compile features – done The project is named: hello The project is used for: This is a simple, but quite verbose cmakelists file The c standard is: 11 The cpp standard is: 17 The current source dir is: /var/home/kps/learning_cmake/my_cmake_code_examples/step0_ansi_c The current binary dir is: /var/home/kps/learning_cmake/my_cmake_code_examples/step0_ansi_c/build — Configuring done (0.2s) — Generating done (0.0s) — Build files have been written to: /var/home/kps/learning_cmake/my_cmake_code_examples/step0_ansi_c/build |
The information shown doesn’t show anything mysterious.
When doing a cross-compile, compiling for a different architecture, on a given architecture it is important to know if the correct compiler is used.
The raspberry Pi uses a different architecture then the RP2xxx.
A second execution shows the messages, but doesn’t change the configuration:
|
1 2 3 4 5 6 7 8 9 10 11 |
$ cmake –B build | tee cmake_conf.txt The minimum cmake version required is: 3.28.3 The project is named: hello The project is used for: This is a simple, but quite verbose cmakelists file The c standard is: 11 The cpp standard is: 17 The current source dir is: /var/home/kps/learning_cmake/my_cmake_code_examples/step0_ansi_c The current binary dir is: /var/home/kps/learning_cmake/my_cmake_code_examples/step0_ansi_c/build — Configuring done (0.0s) — Generating done (0.0s) — Build files have been written to: /var/home/kps/learning_cmake/my_cmake_code_examples/step0_ansi_c/build |
Compiling this with:
|
1 2 3 4 |
$ cmake —build build | tee cmake_build.txt [ 50%] Building C object CMakeFiles/hello.dir/hello_world.c.o [100%] Linking C executable hello [100%] Built target hello |
Verify the executable exists:
|
1 2 |
$ ll ./build/hello –rwxr–xr–x. 1 kps kps 15968 Mar 17 14:11 ./build/hello* |
To our surprise, executing the program prints “hello, world!” in the terminal.
|
1 2 |
$ ./build/hello hello, world! |
Some remarks.
I am a friend of excessive indentation.
This helps me to avoid making mistakes I cannot find by myself.
I really hate those solutions found for whatever language where for example a Jupyter Notebook has single row commands in a cell, because initially it looks like single rows only are allowed.
No, you CAN use newlines and tabs in a Jupyter Notebook cell!
In addition it gives me time to understand what I am doing why.
Using „message()“ provides additional useful information, because a year from now I do not know anymore what I thought today.
What next.
The next example will split an application in several files and combines them into an executable.
A second example using a sub-function
Stay tuned!